

|
RR-CirKits, Inc.
Specializing in Affordable Electronics for Model Railroads |
(Minor upgrades from the MER presentation.)
By Dick BronsonBy Peter Ely
(Minor upgrades from the St Louis presentation.)
By Dick BronsonJMRI is a free software suite for programming decoders, creating panels, and other operations. For more information and to download your own copy go to http://www.jmri.org.
JMRI is a free software suite for programming decoders, creating panels, and other operations. For more information and to download your own copy go to http://www.jmri.org.
Different signals may show an aspect using different combinations of lights, semaphore positions, and/or placards; these are called "appearances". For example, the "stop" aspect will be a single red lamp on a signal mast with one head, red over red lamps for a signal mast with two heads, etc.
Starting with JMRI 2.9.1 (early 2010), JMRI added "Signal Mast" objects that each represent an entire signal, not just an individual head. A Signal Mast can operate one or more heads, as required to do full prototypical signaling based on aspects. When its "Aspect" is set to e.g. "Approach Medium", it handles all the layout operations needed to make the signals on the layout appear properly.
Signal Masts are configured through the Signal Mast Table. You add new ones with the "Add..." button on the table, which takes you to the "Add Signal Mast" window. To add a new signal mast, you specify what kind of signaling system it uses (see systems), the specific signal type like "double searchlight" or "double head dwarf", and what layout signal heads it's going to drive.
If the layout has been drawn up on the layout editor and the
SignalMasts have
been placed on the panel using its various tools, then it is possible
for all the Signal Mast logic to be dynamically built, with little user
interaction. Signal masts may also be easily added to panels created
with Panel Editor or Control Panel Editor.
Due to the many new features available in the latest version of JMRI the clinics for 2009 have been completely redone from the beginning. Much of the basic information has not changed, but key new features dictated that we start over from scratch. During this process I was working closely with the developers, and actually overshot the official 2.6.1 official release. This means that there are some features covered in these clinics that were not publicly available until the JMRI 2.7.4 test release. If you see a feature that you like, and it is not in the version you are using, then consider upgrading to a newer version. As I told the folks at my clinics, If you see a test release that has been out for more than a week or so without a newer one replacing it, then feel confident that it will not cause you problems. However, and always, be aware that files created and/or updated with newer versions of PanelPro will probably not work 100% right with any older versions. Always make a backup of any panel files in case you need to return to an older version for any reason.
I created this new series of clinics using OpenOffice.org Impress running on Ubuntu Linux and then saved them in both .ppt (Power Point) and .pdf (Adobe) formats. The .ppt files will allow you to step through them as a slide show. The .pdf format is more compact in file size, and is easier to print out in dead tree (hardcopy) format.
Like previous presentations (see below) these presentation files are large and have been broken up into smaller sections for easier downloads. There is a matching set of PanelPro files in .xml format to go along with each presentation. Download these and save them to your local JMRI folder on your own machine, do NOT try to open them with IE or MS Word, they will show up as blank files. You can edit or view them with a simple text editor or else an XML editor such as XML Marker from Symbolclick. Do not be tempted to use the Microsoft XML editor because it saves the files with a format error that prevents any further use by PanelPro.
These panel files expect that you are running JMRI 2.7.4 or later in order to load and run properly. They use the LocoNet Simulator, but also will interface with a LocoNet layout using actual sensors and turnouts. If your LocoNet layout has different items attached at the addresses used by this demo it may behave strangely while running the demo files. Simply switch into simulator mode to prevent this.
Intro to PanelPro. Covers the basics of how to build a simple classic CTC panel image and use it to control turnouts using Active Images.
Intro 09-1 PP.pdf (1,537 Kb)
Intro 09-1 PP.ppt (4,080
Kb)
2009Clinic1.xml (6 Kb)
Intro 09-2 PP.pdf (1,505
Kb)
Intro 09-2 PP.ppt (3,184
Kb)
2009Clinic2.xml (19
Kb)
Intro to Logix.
Indirect layout control. Covers how to use the JMRI graphical logic
tools known
as
Logix
to
add
some
simple
interlocking rules.
Intro 09-3 Logix.pdf (2,134 Kb)
Intro 09-3 Logix.ppt (3,802 Kb)
2009Clinic3.xml (22 Kb)
Intro to Edit. Covers new copy
and editing features that allow easy changes to panels and Logix.
Intro 09-4 Edit.pdf (680 Kb)
Intro 09-4 Edit.ppt (1,216 Kb)
2009Clinic4.xml (32 Kb)
Intro to SSL. Covers how to add
ABS signals to your layout using PanelPro SSL. This could include a
panel controlling your turnouts, or simply be running on a dedicated
machine under the layout doing your signal logic.
Intro 09-5 SSL.pdf (1,616
Kb)
Intro 09-5 SSL.ppt (856 Kb)
2009Clinic5.xml (57 Kb)
Intro 09-6 SSL-Adv.pdf (733 Kb)
Intro 09-6 SSL-Adv.ppt (2,075 Kb)
2009Clinic6.xml (73 Kb)
Intro to CTC. Covers how to add
CTC to your panel. Include sounds and delays.As those who attended the
CTC clinic already know, the Intro 09-8 CTC-Logix.ppt and
2009Clinic8.xml files mentioned in the presentation do not yet exist in
completed form.
Intro 09-7 CTC.pdf (2,182
Kb)
Intro 09-7 CTC.ppt (3,722
Kb)
2009Clinic7.xml (97
Kb)
Intro 09-8 CTC-Logix.ppt (384 Kb)
2009Clinic8.xml (114 Kb)
2009Clinic7.xml (0 Kb)
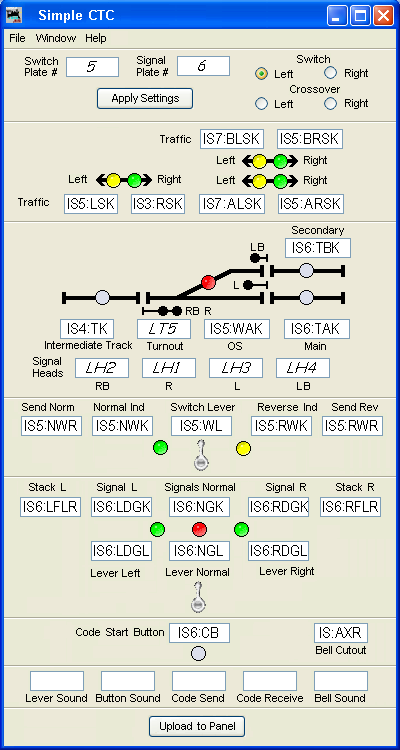
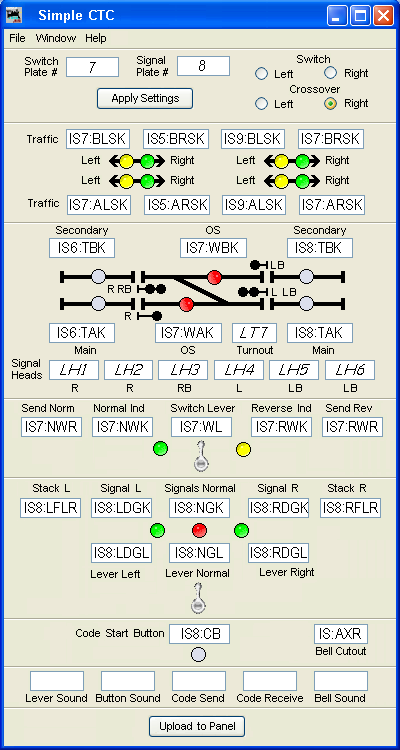
The following images show the all the default sensor values used in
these clinics.
Note: this feature is not yet available in PanelPro.
I created this new series of clinics using OpenOffice.org Impress running on Ubuntu Linux and then saved them in both .ppt (Power Point) and .pdf (Adobe) formats. The .ppt files will allow you to step through them as a slide show. The .pdf format is more compact in file size, and is easier to print out in dead tree (hardcopy) format.
Like previous presentations (see below) these presentation files are large and have been broken up into smaller sections for easier downloads. There is a set of PanelPro files in .xml format to go along with each presentation. Download these and save them to your local JMRI folder on your own machine, do NOT try to open them with IE or MS Word, they will show up as blank files. You can edit or view them with a simple text editor or else an XML editor such as XML Marker from Symbolclick. Do not be tempted to use the Microsoft XML editor because it saves the files with a format error that prevents any further use by PanelPro.
These panel files expect that you are running JMRI 2.2 or later in order to load and run properly. They use the LocoNet Simulator, but also will interface with a LocoNet layout using actual sensors and turnouts. If your LocoNet layout has different items attached at the addresses used by this demo it may behave strangely while running the demo files. Simply switch into simulator mode to prevent this.
Intro to PanelPro. Covers the basics of how to build a simple classic CTC panel image and use it to control turnouts.
Intro to PP-1.pdf (1,380 Kb)
Intro to PP-1.ppt (2,817
Kb)
PanelEditorClinic1.xml (6 Kb)
Intro to PP-2.pdf (1,834
Kb)
Intro to PP-2.ppt (3,235
Kb)
PanelEditorClinic2.xml (19 Kb)
Intro to PP-3.pdf (2,319
Kb)
Intro to PP-3.ppt (3,559
Kb)
PanelEditorClinic3.xml (22 Kb)
Intro to SSL. Covers how to add
ABS signals to your layout using PanelPro SSL. This could include a
panel controlling your turnouts, or simply be running on a dedicated
machine under the layout doing your signal logic.
Intro to SSL-1.pdf (586
Kb)
Intro to SSL-1.ppt (856
Kb)
SSLClinic1.xml (28 Kb)
Intro to SSL-2.pdf (1,430
Kb)
Intro to SSL-2.ppt (2,075
Kb)
SSLClinic2.xml (58 Kb)
Intro to CTC. Covers how to add
CTC to your panel. The first panel shows all the underlying controls
used for the signals and interlocking. The second version of the panel
strips out all the extra information and presents the panel more like
an operator half a century ago would see it. Both versions include
sounds and delays.
Intro to CTC-1.pdf (1,939
Kb)
Intro to CTC-1.ppt (3,350
Kb)
CTCClinic1.xml (256 Kb)
Intro to CTC-2.pdf (751
Kb)
Intro to CTC-2.ppt (1,118
Kb)
CTCClinic2.xml (234 Kb)
The older clinic series is presented in the form of a series of Macromedia Flash files. These files are very large, so I have split them into shorter segments for more reasonable download times. I have also noted their sizes for your information. To get your free copy of the Macromedia Flash player follow the above link. The EXE versions available for some of the older files may run with better resolution for Windows only. However the scroll bar does not work.
To proceed from one page to the next after reading the appropriate text click on the "Next" button located near the lower right side of each frame. The "back" button returns you to the previous section. You may also control the presentation with the button and time bar at the bottom of the screen. You may pause or resume a presentation at any point with the Pause/Play button at the left end of the time bar. Dragging the slider along the time bar allows you to easily skip ahead or back any amount.
These frames were created at a resolution of 800x600 so you may need to maximize your browsers viewing area to see them clearly. It is recommended that you download the files and run them locally from your own machine.
These clinics are linked from one to another. You can start at any point and move backward or forward from there. There are also "skip ahead" points to pass repeat information that you already understand well.
To run off-line, copy both the .htm and .swf files to a disk, and run them from there. The first (.htm) links force your browsers image window to the correct size. The second (.swf) files are the actual Flash presentations.
1. Getting started. - PP-07-Clinic-1.swf (5.1 Mb)
2. Turnout Feedback. - PP-07-Clinic-2.swf (948 Kb)
3. Sensors. - PP-07-Clinic-3.swf (2.5 Mb)
4. Signal Heads. - PP-07-Clinic-4.swf (3.2 Mb)
5. Simple Signal Logic (ABS). - PP-07-Clinic-5.swf (2.4 Mb)
6. Basic Logix for Code Buttons & OS
Interlocking. - PP-07-Clinic-6.swf
(4.6 Mb)
7. Intro to Multi-Sensor Icons &
Sensor Groups. - PP-07-Clinic-7.swf
(3.7 Mb)
8. Intermediate Logix for CTC. - PP-07-Clinic-8.swf (5.5 Mb)
9. Advanced Logix details of the full CTC implementation. - there are
no flash
files available for Clinics 9-11. The .xml files may be loaded and
include easy
to follow user names for each item.
Here are the Panel Pro files for each step. Copy and save them to your own machine, do NOT try to open them with IE. They expect that you are running JMRI 1.8 or later. For the final panels (PP-07-Clinic-9.xml) and above. you will also need to add some image and sound files to your resources folders to properly run the example. (see below)
A special thanks to Mike Burgett and Mike Weber of Control Train Components http://www.ctcparts.com/ for all their patience in explaining just exactly how a mid century USS CTC system works. The changes between the simplistic system shown in session 8 and the full system presented in session 9 reflect their input.
PP-07-Clinic-1.xml
PP-07-Clinic-2.xml
PP-07-Clinic-3.xml
PP-07-Clinic-4.xml
PP-07-Clinic-5.xml
PP-07-Clinic-6.xml
PP-07-Clinic-7.xml
PP-07-Clinic-7a.xml
PP-07-Clinic-7b.xml
PP-07-Clinic-8.xml
PP-07-Clinic-9.xml
PP-07-Clinic-10.xml This is the
prototypical (no animation) panel.
PP-07-Clinic-11.xml This is the fully
animated version including each traffic direction indication, including
the passing sidings. The extra indicators are included to assist in
understanding the operation.
The traffic direction arrow graphic goes in the
"JMRI/resources/icons/USS/plate/base-plates/misc/"
folder. traffic.gif (double
ended white arrow)
The sounds go in the "JMRI/resources/sounds/" folder. Download
temporary sounds. JMRI latest versions
(2.0
or
later) include the required sound and image
files.
1. Getting started with Decoder Pro and Panel Pro by setting up your hardware interface. JMRI-Preferences (2.71MB) EXE
2. Decoder Pro Roster (not yet completed)
3. Decoder Pro Programming Decoders (not yet completed)
4. Panel Pro graphics. The basics of loading a background and adding some text and graphics. Panel Pro Graphics (5.13MB) IJ2006 PP-Clinic-1 (6.51MB) EXE
5. Turnout Feedback. IJ2006 PP-Clinic-2 (1.18MB) EXE
6. Panel Pro sensors. This takes you through the steps of adding sensors to your panel. Panel Pro Sensors (2.05MB) IJ2006 PP-Clinic-3 (3,52MB) EXE
7. Panel Pro Signals. This step adds some signal heads. Panel Pro Signals (4.99MB) IJ2006 PP-Clinic-4 (5.28MB) EXE
8. Simple Signal Logic. IJ2006 PP-Clinic-5 (3.26MB) EXE
9. Code button controlled turnouts using Route Table. IJ2006 PP-Clinic-6 (4.53MB) EXE
10. Basic Scripting. (not yet completed)
PanelPro control files for the above:
PP-Clinic-1
PP-Clinic-2
PP-Clinic-3
PP-Clinic-4
PP-Clinic-5
PP-Clinic-6
TC-64-Test.xml
9-January-15 ©RR-CirKits please ask permission to use these files in public presentations. There are versions available that will run faster for clinic presentation use.